
ZMR 250 4S Conversion – Basic Betaflight Setup
Category : FPV
In part 2 of the ZMR 250 4S conversion build series we’ll take a look at migrating from Cleanflight to Betaflight with the NAZE 32 F1 Revision 5 board. This tutorial will also serve as a guide to those who may be setting up Betaflight from the get-go!
We’ll cover the following steps:
- Flashing Cleanflight to NAZE 32 board
- Basic settings using Betaflight Configurator
- Taranis D4R-II Receiver setup using CPPM
The purpose if this tutorial is intended to be very basic in order to get you in the air quickly and not get bogged down with complex setups. Let’s get started.
Flashing Betaflight to NAZE 32 Board
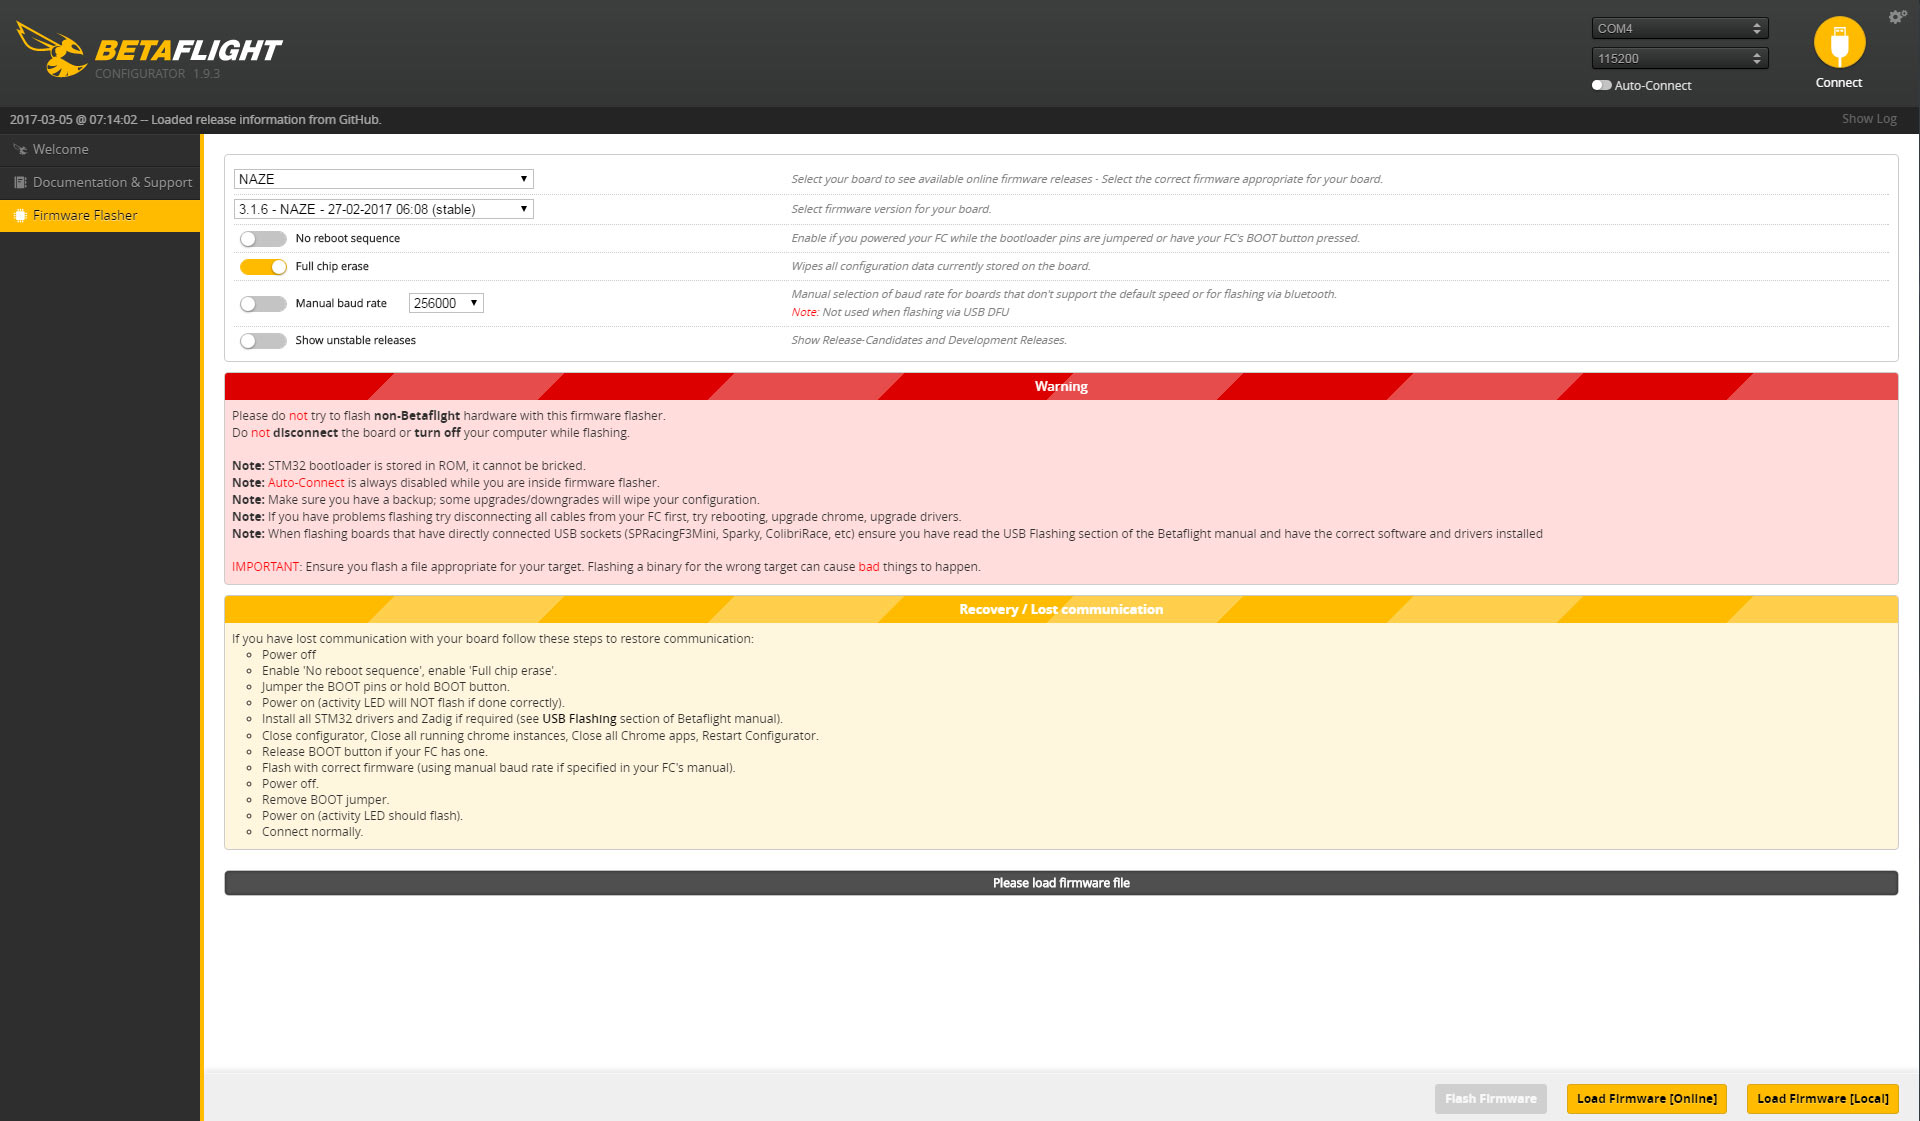
If you haven’t already, be sure to download the Betaflight configurator extension from the Chrome store. Connect your board with a USB cable and launch the Betaflight Configurator. Click on the “Firmware Flasher” tab on the main screen. Choose your board from the dropdown menu and choose the most recent version of the Betaflight release from the firmware dropdown menu.
The only other setting on this screen that should be changed is to enable “Full Chip Erase” so we can start from a clean slate.
Basic Setup Using Betaflight Configurator
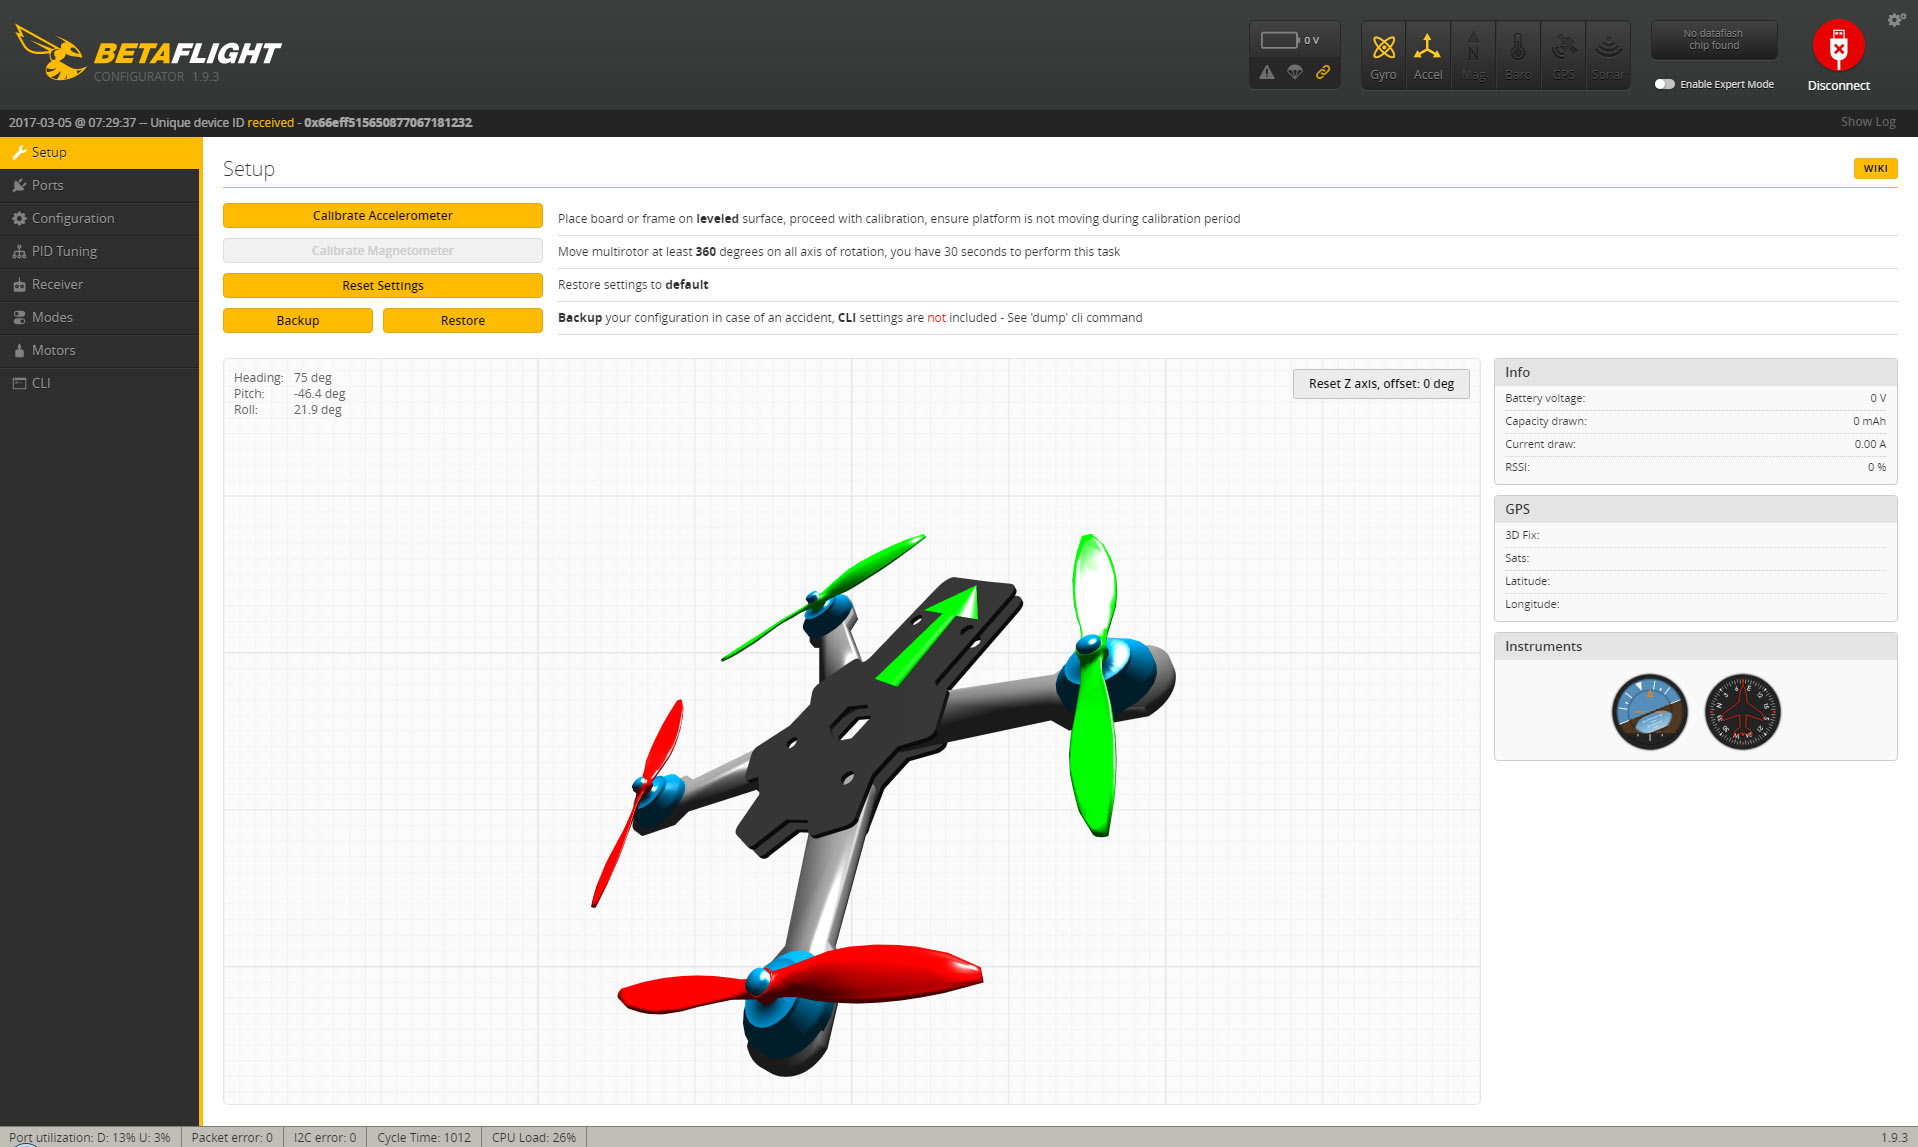
Once the Betaflight firmware has been flashed to the board it will reboot. Click the “Connect” button in the upper right of your screen which will take you directly to the main “Setup” tab. On the setup screen you will see a graphic of your quadcopter showing it’s orientation. Move the quad copter around making sure each axis is moving the correct direction. For example, if you roll your quadcopter to the right, it should roll to the right on the screen. Check each axis: roll, pitch, and yaw.
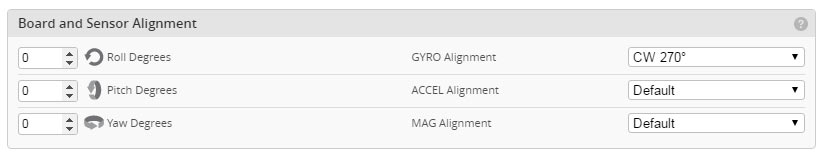
If a particular axis is NOT moving in the proper direction, follow these steps:
- Click on the configuration tab
- Scroll down to the “board alignment” section.
- Only change one axis at a time – using the dropdowns to the right to adjust the board in the desired direction. Once you make a change click on the SAVE AND REBOOT button on the lower right of the screen.
- Go back to the setup tab and check each axis again for proper movement.
- Repeat as needed until each axis is oriented correctly.
- Adjust only one axis at a time until that is set properly.
Now that the board is aligned properly, move on to the Configuration Tab (we’ll come back to the ports tab in a later tutorial once we setup telemetry with the D4R-II Receiver).
Here are the basic settings you need to check and set properly for your particular quadcopter.
- Mixer – Choose quad type (Default is quad x shape)
- ESC/Motor Features – Set ESC protocol based on your particular ESC, for this example we’ll use MULTISHOT for the LittleBee 35 amp BLHeli_S ESC’s we are using.
- Min and Max throttle – I like to set min to be a min of 1000 and a max of 2000
- Minimum command ( you can leave this as default or change it to match the min throttle setting if you don’t want your props to spool up slightly when armed.)
- Receiver – Set this to match your Receiver, for this particular quad I’ll set it to PPM RX Input – since we will be using CPPM on the D4R-II Receiver.
- All other settings on this tab can remain as default for now.
- SAVE AND REBOOT!
Quadcopter should now be responding to Inputs from your transmitter.
With those basic settings in place, we can move on to the Receiver tab to make sure we are seeing the inputs from the correct channels. The following assumes you have already bound the receiver to your radio.
Move the sticks around on your transmitter to make sure pitch, roll, and yaw are all on the proper channels. For the Taranis FrSky Transmitter your channel mapping should be: TAER1234. You can choose this from the dropdown or manually type it in.
I also like to setup an arming switch on my radio right away, otherwise you have to hold full left yaw and zero throttle to arm and disarm. Having it on a switch will allow you to instantly dis-arm the quad in case of a crash!
To setup an arming switch on the Taranis X9d Plus, follow these steps.
- From the main screen press MENU once
- Then Press PAGE until you get to the INPUTS screen (5/12)
- Press the – (minus) button on the right of the transmitter until you highlight the next available empty input – (in most cases it should be right after the rudder input on this screen).
- Press Enter Once to enter the setup area for this new input.
- Set the SOURCE to be the switch you want to use.
- use the – (minus) key to highlight the SOURCE area and press ENTER once.
- Then simply toggle the switch up and down you wish to use… it will then record this as the input you want to use.
- Press exit until you are back to the Input screen.
- Next, press PAGE once more to advance to the MIXER screen.
- Use the – (minus) button to navigate down to the next open channel – usually this will be CH5. Press enter once.
- Go to the “SOURCE” area once again and choose either the switch name or the name of the input if you named it on the INPUTS screen.
- Press EXIT until you are back at the main MIXER screen.
You should now see the switch show up as AUX 1 in the Betaflight configurator. You may have to connect your flight battery to power the Receiver – MAKE SURE THE PROPS ARE REMOVED!!!
Add additional switches as needed. For CPPM on the D4R-II Receiver they recommended NOT using MORE than 6 channels.
Finally we will move on to the Modes tab in the Betaflight configurator. We’ll use this new switch we setup to Arm the quadcopter for flight.
With the receiver inputs all moving the proper way, we can adjust the ARM sliders to be activated when the arm switch is flipped up or down. In this particular case with the ZMR 250 I set the ARM mode to activate when the switch is in the UP position. Adjust the sliders so they cover where the little yellow tick as shown.
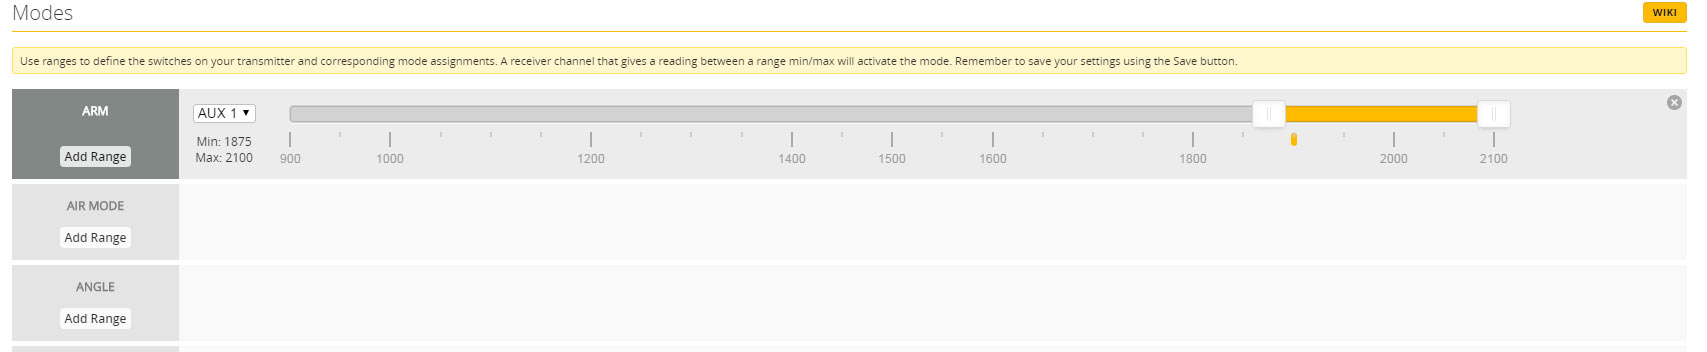
SAVE AND REBOOT!
In Part 3 we’ll take a look at setting up failsafe using the Taranis D4R-II Rreceiver.